
- Joined
- Jan 12, 2022
- Messages
- 48
- OS Version
- Ubuntu
Prepare by downloading the Ubuntu flavour of choice from the official Ubuntu website. Make a bootable Ubuntu USB with Rufus following this tutorial.
Enabling Developer Mode
Entering Developer Mode requires you to first boot into Recovery Mode. For Chromebooks, this means pressing [ESC+Refresh+Power]; On Chromeboxes, there is usually a physical recovery button (often a small hole above the SD card reader) which must be depressed when powering on. Once at the recovery screen, press [CTRL+D] to enable developer mode, then confirm when prompted. As a security measure, transitioning to/from Developer Mode will wipe out all ChromeOS user data, essentially powerwashing (resetting) the device.
Exiting Developer Mode is as simple as following the instructions on the Developer Mode boot screen (usually pressing [SPACE]), but may require resetting the firmware boot flags if you've changed them. As with entering developer mode, exiting will wipe all ChromeOS user data, so if you plan on keeping your device in developer mode, it's a good idea to set the firmware boot flags to prevent accidental exiting and loss of data.
Getting a (Root-capable) Shell
Once in developer mode, there are two ways to get a root-capable shell, which is required for doing anything useful:
NOTE: Starting with ChromeOS R117, this script must be run from a VT2 terminal (from login screen: [CTRL+ALT+F2], login chronos); it cannot be run from a crosh shell ([CTRL+ALT+T] when logged in) due to the removal of sudo, or from a crostini (penguin) terminal; crostini is a virtualized container and lacks the necessary access to read or modify the firmware.
Installing the Firmware and Boot From USB
Then follow the steps below or go here. In this tutorial we will be installing the RW_LEGACY Firmware which allows us to boot from USB and Try/Install Ubuntu (or any other flavor). It is also the only option that works without removing read/write protection from you Chromebook.
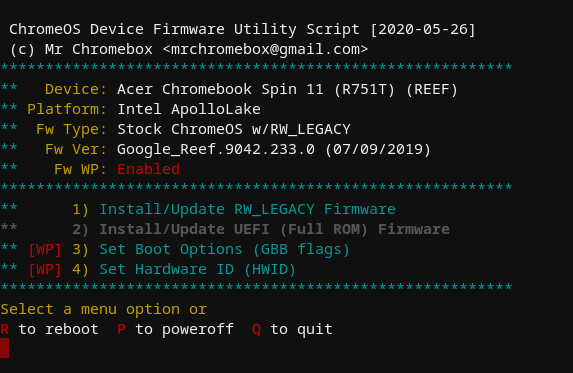
After the commands you should be presented with this
---
In order to get audio working, open the terminal and write in the following commands in order and then reboot your machine. Make sure you have python and git installed if it doesn't come with the distro you use.
---
To get the function keys to work properly (lower/raise volume, brightness etc) run the following commands in a terminal. As per above, git must be installed.
Enabling Developer Mode
Entering Developer Mode requires you to first boot into Recovery Mode. For Chromebooks, this means pressing [ESC+Refresh+Power]; On Chromeboxes, there is usually a physical recovery button (often a small hole above the SD card reader) which must be depressed when powering on. Once at the recovery screen, press [CTRL+D] to enable developer mode, then confirm when prompted. As a security measure, transitioning to/from Developer Mode will wipe out all ChromeOS user data, essentially powerwashing (resetting) the device.
Exiting Developer Mode is as simple as following the instructions on the Developer Mode boot screen (usually pressing [SPACE]), but may require resetting the firmware boot flags if you've changed them. As with entering developer mode, exiting will wipe all ChromeOS user data, so if you plan on keeping your device in developer mode, it's a good idea to set the firmware boot flags to prevent accidental exiting and loss of data.
Getting a (Root-capable) Shell
Once in developer mode, there are two ways to get a root-capable shell, which is required for doing anything useful:
NOTE: Starting with ChromeOS R117, this script must be run from a VT2 terminal (from login screen: [CTRL+ALT+F2], login chronos); it cannot be run from a crosh shell ([CTRL+ALT+T] when logged in) due to the removal of sudo, or from a crostini (penguin) terminal; crostini is a virtualized container and lacks the necessary access to read or modify the firmware.
- On the login screen, press [Ctrl+Alt+F2] (F2 is right-arrow on ChromeOS keyboards), then login with user 'chronos' (no password is required, nor should one be set)
- When logged in (as a guest is ok) and with a browser window open, press [Ctrl+Alt+T], then type shell and press [ENTER]
Installing the Firmware and Boot From USB
Then follow the steps below or go here. In this tutorial we will be installing the RW_LEGACY Firmware which allows us to boot from USB and Try/Install Ubuntu (or any other flavor). It is also the only option that works without removing read/write protection from you Chromebook.
- Logged into your Chromebox, press Ctrl+Alt+T to open the terminal.
- In the terminal, write 'shell'.
- Then run the next three commands one by one.
cd; curl -LO mrchromebox.tech/firmware-util.shsudo install -Dt /usr/local/bin -m 755 firmware-util.shsudo firmware-util.shAfter the commands you should be presented with this
- Press '1' on your keyboard.
- You will be presented with a message that says "If N, always boot from internal storage unless selected from boot menu".
- We want to press 'y' here. This makes your Chromebook always boot into Ubuntu when starting up.
- Let the firmware install. Once done, a green message should appear saying "RW_LEGACY firmware successfully installed/updated."
- Press 'Enter'
- Power off your Chromebook and power it on again
- This time, instead of pressing 'Ctrl+D', press 'Ctrl+L' and then press '1' followed by 'Esc' to enter the boot menu.
- Select your USB
---
In order to get audio working, open the terminal and write in the following commands in order and then reboot your machine. Make sure you have python and git installed if it doesn't come with the distro you use.
git clone https://github.com/WeirdTreeThing/chromebook-linux-audiocd chromebook-linux-audio./setup-audio---
To get the function keys to work properly (lower/raise volume, brightness etc) run the following commands in a terminal. As per above, git must be installed.
git clone https://github.com/WeirdTreeThing/cros-keyboard-mapcd cros-keyboard-map./install.sh